After building a blog using GitHub Pages + Hexo + NexT for Hexo Blog and using it for a while, I wanted to further customize and beautify it, so I’m recording my notes here. During the process, I found that the English documentation is much more detailed than the Chinese documentation. Basically every setting involved in thems/next/_config.yaml is explained, so if your English is good enough, just read the English docs: https://theme-next.org/docs/ .
In addition, remember to promptly deploy and preview changes locally at http://localhost:4000/ using hexo s after each modification to see whether it meets your expectations.
Author: Muniao’s Miscellany https://www.qtmuniao.com, please indicate the source when reposting
Adding an “About” Tab
Since I use the NexT theme, two steps are enough:
-
Create an index page via the Hexo engine:
hexo new page "about" -
To display the
aboutlink in the menu, simply uncommentaboutin themenusection of the theme’s_configy.yml.1
2
3
4
5menu:
home: /
archives: /archives || archive
tags: /tags || tags
about: /about || user
To add other tab pages on the homepage, just follow the same pattern. Note that || represents the corresponding icon ID in Font Awesome.
Enforcing HTTPS
HTTPS has many benefits:
- Protects website integrity and prevents malicious intrusion.
- Protects user privacy and security.
- It is the future direction of the web.
Therefore, I decided to enforce HTTPS access for my blog.
- If it is a self-hosted personal site, you need to apply for a certificate. Tencent and Let’s Encrypt provide free certificates.
- But my blog uses GitHub Pages, so it is extremely simple—just check “Enforce HTTPS” in the blog repo settings.
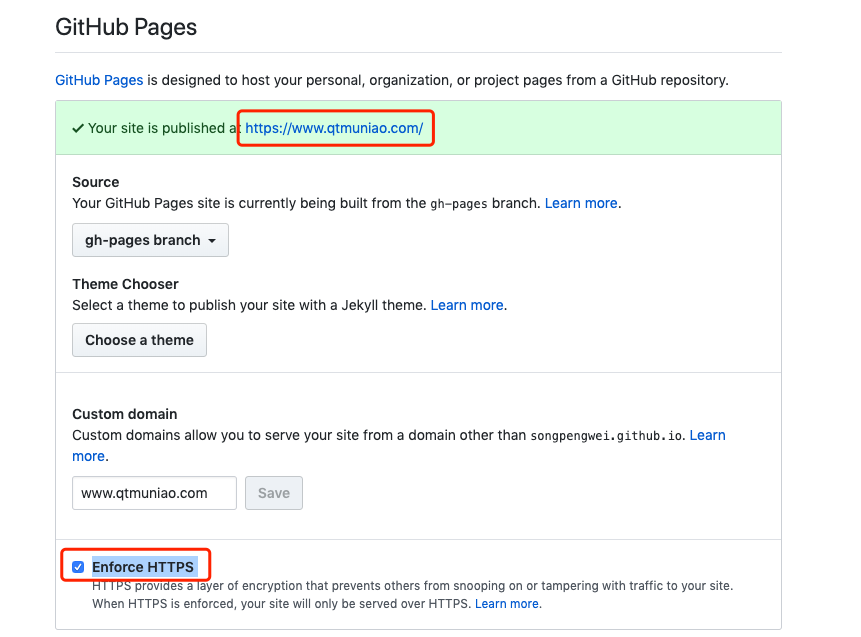 enforce https
Drafts && Layouts
Draft Layout
To avoid publishing half-finished articles, you can choose draft when creating a layout: hexo new draft "blog title". However, I found that the generated page has no date. After some searching, I found its template location: ./hexo-folder/scaffolds/draft.md, and modified it as follows:
1 | --- |
Generalized Layouts
More generally, you can customize any number of layouts in scaffolds; draft and page are the two most commonly used:
-
post: Those placed here will be published as articles.
-
draft: Place here to avoid half-finished articles being published.
-
page: Add tab pages on the homepage.
To publish different types of articles, such as travelogues, technology posts, etc., you can create multiple layouts in advance (by embedding some default variables and HTML code), and then use hexo new layout "title" to create an article with that layout. Of course, the article will be created in the post folder by default.
For example:
1 | ~: cp scaffolds/page.md scaffolds/test.md |
This will create an article with the test template: ~/Code/blog/hexo/source/_posts/2019-10-16-test.md
Note: If no layout is specified, the default_layout parameter in _config.yml will be used by default. Generally it is post.
Moving Articles
Moving articles from draft to post or vice versa only requires the shell mv command.
Series
Since some articles have inherent connections, in addition to using categories and tags, you can also organize them in series. The main idea is to create a new tab page and then manually organize the desired articles using internal references.
Creating a New Tab Page
First, create a new tab page using the Hexo command.
1 | hexo new page series |
Then modify the themes/next/_config.yaml menu configuration and add a line:
1 | series: /series/ || reorder |
Finally, add the corresponding Chinese label: modify themes/next/languages/zh-CN.yml and add series: 专题 under the menu item.
Then add the corresponding Chinese label: modify themes/next/languages/zh-CN.yml and add series: 专题 under the menu item.
Editing index.md to Organize the Series Catalog
Just edit index.md like an article. To reference internal articles, use the following Hexo syntax:
1 | {% post_link post-name post-title %} |
post_link: keyword for internal article references, just copy it.
post-name: the name of your md file, without the date.
post-title: the link title for that article; if left empty, it will be extracted from the article.
Homepage Truncation Settings
By default, the homepage displays the full text of articles. Especially since some of my translated articles are very long, the homepage first screen can only show one article. Solution: set excerpt_description to true in the theme configuration file,
1 | excerpt_description: true |
Then add the following code at the point where you want to truncate in the article:
1 | <!-- more --> |
Of course, there is another approach. That is, when writing the article, specify the excerpt in the metadata: description. This was actually mentioned above:
1 | --- |
For details, see here in the official documentation.
Related Articles Recommendation
First, you need to install a Hexo plugin, and then configure it accordingly in the theme config.
Install the related popular posts plugin:
1 | npm install hexo-related-popular-posts --save |
If you encounter issues, you can refer to here.
Configure NexT
Configure in themes/next/_config.yaml:
1 | related_posts: |
Adding Visitor Count to Footer
Using Busuanzi, unlike the detailed statistics from Baidu and Google, you can simply display site visits and visitor count on the webpage with two lines of code.
Specifically for the NexT theme, just add the following code at the bottom of the footer template (themes/next/layout/_partials/footer.swig):
1 | <div class="powered-by"> |
Blog Article Search
First install the Node plugin: hexo-generator-searchdb, execute in the blog root directory:
1 | npm install hexo-generator-searchdb --save |
Then modify the blog site config file (~/hexo/_config.yml), and add the following code:
1 | search: |
Finally, in the theme config file (themes/next/_config.yml), find local_search and set it to true; other items are optional:
1 | # Local Search |
Then a search box will appear in the tab page column.
Note: When installing the hexo-generator-searchdb package, if an error occurs, please fix the relevant dependencies according to the error message yourself, otherwise the search box may not display correctly.
Displaying Reading Progress
Theme settings file (themes/next/_config.yml:
1 | # Reading progress bar |
Sitemap
The role of a sitemap is to provide search engines with an overview of your website, doing SEO for your site.
First install the corresponding npm plugin, then enable the configuration in both Hexo and the NexT theme.
Install Plugin
1 | npm install hexo-generator-sitemap --save |
Hexo Config File
Add the config item in hexo/_config.xml:
1 | # Extensions |
NexT Config File
Modify themes/next/_config.xml and uncomment the corresponding line:
1 | menu: |
Verify
Execute the command to regenerate source files:
1 | hexo clean |
If the above operations go smoothly, you will find:
- An additional sitemap item appears in the left sidebar of the homepage; clicking it shows all your articles’ URLs organized in XML format.
- The sitemap path should be: www.yoursite.com/sitemap.xml
Then, you can submit this sitemap URL to Google: https://search.google.com/search-console.
For more details, refer to: http://lindaxiao-hust.github.io/2016/04/06/hexo-next-sitemap/
Gallery
Since I usually take some photos in my spare time, I wanted a page to display them. After some exploration, I found that it can be implemented using NexT’s group picture plugin. Its principle is very simple: it uses the NexT theme’s Tag Plugin syntax to provide a layout for displaying images.
The following steps are required:
-
First, run
hexo new page photosto create a new tab page named photos, and addphotos: 相册under themenuitem inthemes/next/languages/zh-CN.yml, so that the Chinese “Gallery” will appear in the homepage menu bar. -
Secondly, you can directly write content in
source/photos/index.md, and use the following method to organize your image list when inserting images:1
2
3
4
5
6
7
8
9## 某某地方玩
{% gp 6-3 %}


{% endgp %}Where ‘6-3’ means the group has six images in total, with at most three per row.
-
In addition to images, other text and section titles can be added as usual.
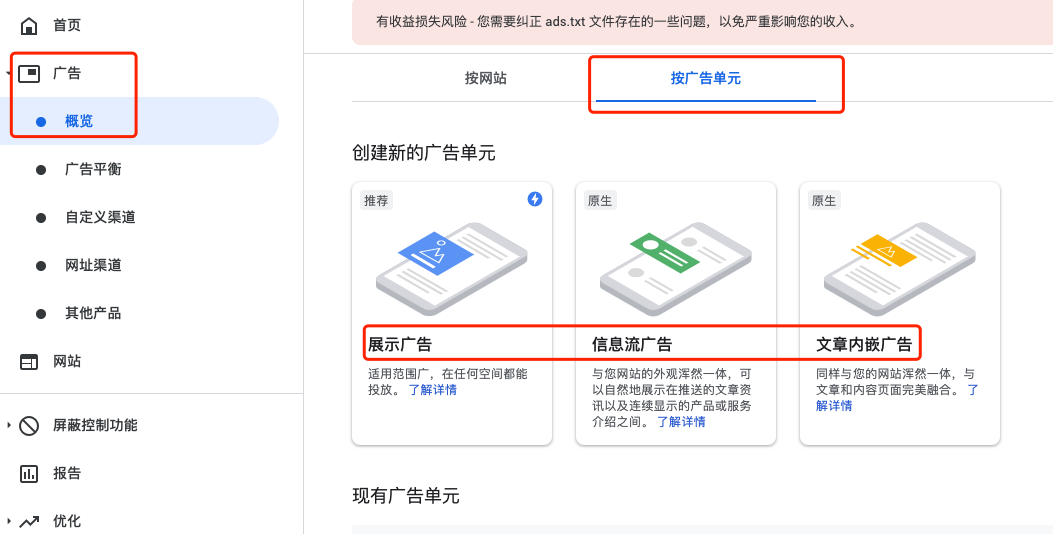
Ads
Here mainly for Google Ads.
Opening an Account
As everyone knows, Google is the world’s largest advertising intermediary, allowing you to monetize your traffic. The specific approach is to tell Google where your traffic is; it will dynamically push ads to users browsing your website based on their behavior.
You can sign up here: https://www.google.com/adsense, submit your website, and then Google will review it. This article discusses some things to note when applying. Overall, you need to let Google determine that your website is valuable, not spam. As for how it defines spam, the article above covers it.
Embedding Code
Reviews usually have results within a few days. If passed, you can happily place ads on your blog. But there is a problem: how to balance page aesthetics with ad quantity, size, and placement? This is a matter of opinion. My approach mainly has two points:
-
Only display ads. As shown below, Google Ads provides three types. I only choose display ads because their position and size can be strictly controlled by us.
![]()
-
Limit ad size. When defining ads, you can define ad size in the right sidebar. If it is responsive, it is hard to control how it appears on the page. I limit it to very small: 280px * 100px, and only place one.
-
Choose placement location. I choose the bottom of the sidebar, separated by a divider. This requires some custom styles. To define CSS, you can create your own stylesheet:
themes/next/source/css/_my/mycss.styl, and then reference it inthemes/next/source/css/main.styl:1
@import "_my/mycss";
I only added one style:
1
2
3
4
5
6
7.sidebar-ads {
border-top: 1px dotted #ccc;
width: 100%;
height: 100px;
padding-top: 15px;
margin-bottom: 5px;
}This style can be adjusted to your taste. I only know a little CSS, so I could only do this. A better approach is to use Chrome DevTools to tweak elements, finalize the styles, and then copy them to your stylesheet. The final effect can be seen on my blog homepage.
Other Settings
Avatar
Theme config file: avatar: your local/network image path
NexT Color Scheme
File: themes\next\source\css\_variables\base.styl
References
[1] Hexo Theme Next Beautification http://jeffyang.top/Hexo/Hexo%E4%B8%BB%E9%A2%98Next%E7%BE%8E%E5%8C%96/